Fanhome is offering a new subscription box consisting of an Iron Man Partwork Build Up Model that is made of both metal and high-quality ABS. Iron Man comes in pieces in each box, and you need to put each piece together to create this 24″ collectible figure. Iron Man Mark III armor features LED lights on the reactor, hand repulsors, boot thrusters and mask visor, and the figure is loaded with articulation and detail.
The subscription starts at the introductory price of $1.00 USD, and each part of Iron Man you build comes with its own magazine that features instructions for assembly, and explores both Marvel films and comic books through the character’s history.
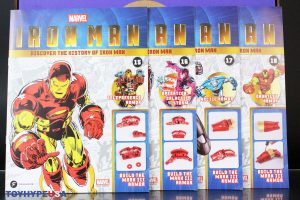
Thank you to FanHome for providing their Iron Man Partwork Build Up Model Subscription Box #6 for review.
Availability: Subscription going on now.
The subscription box is a standard shipping box, with purple and brown, with the FanHome logo in the front. Inside, is everything included, including four magazines, and four bags that includes all the parts needed to complete the build. The video above showcases an in-depth look of the magazines along with the step by step instructions of the building process.
This box includes issues 19, 20, 21, and 22 and focuses on the continuation of the left arm to build Iron Man, including the left elbow, forearm and shoulder joints. Each magazine has different articles related to Iron Man throughout the pages of Marvel Comics, along with different poses of Iron Man on the cover, and a look at different comic books on the back and inside.
Watch the video above for a closer look at the assembly instructions and articles in each magazine
Issue 19 focuses on the left forearm and elbow joint, and you will start by placing the cover on the left forearm that you had previously assembled. Next is the assembly of the shoulder joint, and you will place the elbow joint onto the forearm as specified in the instructions.
Issue 20 focuses on the left shoulder joint, and the first step is to place the adhesive friction discs. Next is the assembly of this part, and you will then use one of the screws and bolts to hold it together.
Issue 21 completes the left shoulder joint, and you will be placing the springs on the sides, and begin screwing the side with the open ring for the screw, and the closed end will be screwed to the frame that slides in on both sides. Next up you will be placing the two circular covers on both sides, and make sure you pay attention as they are marked L1 and L2, and have to go on the correct way. The securing plate will be used in issue 22.
Issue 22 starts off with adding adding adhesive stickers to the arm covers. Then you will place the forearm and elbow joint to one of the arms, and screwing it in as shown. The securing plate attaches to the elbow joint in this step and is required to attach it to the arm. Once this is assembled, you will be placing the top part of it on, and screwing it in. Once assembled, you are done for now, but there are a few steps left to complete the arm.
Overall, the quality and detail on this is amazing, and once put completely together this figure is going to look amazing! Fans are surely in for a treat with the subscription. The assembly is a lot of fun to do and you get satisfaction when plating a step. My recommendation would be to subscribe, and sets like this have been extremely popular to do during quarantine.
Purchase:


Issue 19:


Issue 20:


Issue 21:


Issue 22:


